Reverse-Engineering checklist
This page is a work in progress
The idea of this page is to provide a decision tree of steps to follow when reverse-engineering a new malware sample. I won’t go into details about each step, but I’ll try to provide some useful links, refernces, and the high level approaches that are possible.
I usually update this page when I analyse a sample, once in a while.
Anyway, let’s start. First, →check the file type.
Table of content
Simplified (partial) table of content, without the checklist flow
Check file type
You need to know a type of the file you’re dealing with. This be done manually, or automated with
yara. The best, and simplest, way to do this is to run file command from the command line.
Then inspect the result:
PE32 executable (GUI) Intel 80386, for MS Windows, Nullsoft Installer self-extracting archive, 5 sections- →NSISRich Text Format data, version 1- →RTFComposite Document File V2 Document, ..., Version 10.0, MSI Installer- →MSIComposite Document File V2 Document (other)- →OLEDER Encoded PKCS#7 Signed Data- →DER
Otherwise check →other filetypes
Other filetypes
(TODO: migrate most of these to file)
For other types, you can try exe_kind.yar that will detect some of them (later I will write more ideas about how to detect the file type).
yara exe_kind.yar .
Depending on the file type:
Dump structure in a pseudo-xml format:
$ dumppdf -a > outfile.xml
Javascript
Deobfuscators to consider (installable from npm):
restringer(slow, but often good)js-beautify(quite tolerant)
NSIS
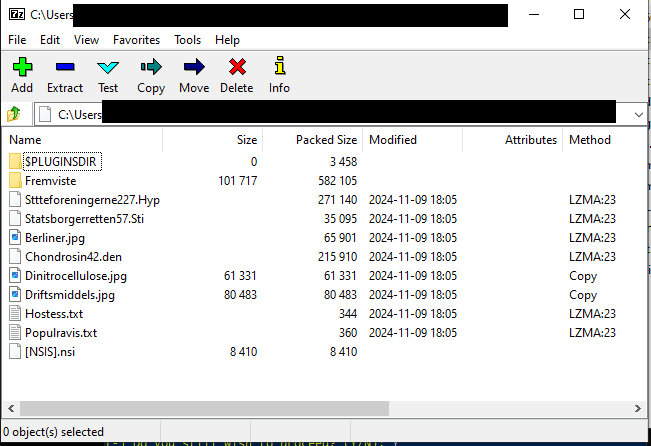
NSIS means Nullsoft Scriptable Install System. It supports self-extracting archives. The archives contain embedded files, and a NSIS script. Unfortunately I don’t know how to extract the embedded script on Linux. Sometimes you can get away by just extracting files:
7z x malware.exe
But this won’t give you a decompiled script. If you need it, there are several windows-only options, see https://nsis.sourceforge.io/Can_I_decompile_an_existing_installer%3F. I use 7z-build-nsis, in the version included in FlareVM. To extract the archive, just open it in 7z-nsis (regular build won’t work) and extract the files somewhere:
There is also a Ghidra NSIS extension but I never got it to work on a maleware sample.
RTF
Rich Text Format. Can hide OLE files. Often abused in phishing attacks, see for example this blog post.
Oletools are great here again.
nix-shell -p python3Packages.oletools
rtfobj my_file.rtf
If it shows something, then (TODO).
Sadly it can also show
---+----------+---------------------------------------------------------------
id |index     |OLE Object
---+----------+---------------------------------------------------------------
0  |00001F9Dh |Not a well-formed OLE object
---+----------+---------------------------------------------------------------
In this case it’s necessary to use another procedure dedicated to →obfuscated RTFs
Obfuscated RTF
There’s a great script called RTFdump online. It’s not currently packaged for nixos (TODO?), so you need to download it.
Run it on the RTF. Example output:
$ python3 rtfdump.py template.rtf
    1 Level  1        c=    2 p=00000000 l=   94442 h=   11005;      27 b=       0   u=    6232 \rtf1
    2  Level  2       c=    0 p=00000016 l=      22 h=       0;       0 b=       0   u=       0 \*\objtime567626769
    3  Level  2       c=    1 p=0000002f l=   94394 h=   11005;      27 b=       0   u=    6232
    4   Level  3      c=    3 p=00001f73 l=   86389 h=    9292;      27 b=       0 O u=       1
      Name: b'nWu9w\x00' Size: 4608 md5: 083c165c4e218855b0150d4c38ec27bd magic: d0cf11e0
    5    Level  4     c=    0 p=00001f9d l=      47 h=       0;      18 b=       0   u=       0 \enspace668406422
    6    Level  4     c=    0 p=00001fcf l=      49 h=      11;      18 b=       0   u=       3 \*\adjust7
    7    Level  4     c=    1 p=00002074 l=     199 h=       0;      27 b=       0   u=       0 \object
    8     Level  5    c=    0 p=000020c3 l=     119 h=       0;      27 b=       0   u=       0
You can get more info about the detected object from stream 4 with:
$ python3 rtfdump.py template.rtf -s 4 -Hi
Name: b'nWu9w\x00'
Position embedded: 0000001e
Size embedded: 00001200
md5: 083c165c4e218855b0150d4c38ec27bd
magic: b'd0cf11e0'
You can also try -F option to search for encoded streams. To unpack the file in this case, run:
python3 rtfdump.py -F template.rtf -s 1
DER
Parse low-level structure
$ openssl pkcs7 -inform DER -in 0.out -print -noout
Alternatively:
$ openssl asn1parse -inform DER -in 0.out
OLE
Compound File Binary, behind old-style Microsoft Office .doc, .xls, .ppt files
and more.
Check the magic. It must be exactly:
$ hexdump -C -n 8
D0 CF 11 E0 A1 B1 1A E1
Using oletools, you can check oleid program:
Filename: xyz.bin
--------------------+--------------------+----------+--------------------------
Indicator           |Value               |Risk      |Description
--------------------+--------------------+----------+--------------------------
File format         |Windows Installer   |info      |
                    |Package (.msi)      |          |
--------------------+--------------------+----------+--------------------------
Container format    |OLE                 |info      |Container type
--------------------+--------------------+----------+--------------------------
Application name    |Intel(R) Common User|info      |Application name declared
                    |Interface           |          |in properties
--------------------+--------------------+----------+--------------------------
Properties code page|1252: ANSI Latin 1; |info      |Code page used for
                    |Western European    |          |properties
                    |(Windows)           |          |
--------------------+--------------------+----------+--------------------------
Author              |Intel Corporation   |info      |Author declared in
                    |3dn partner         |          |properties
--------------------+--------------------+----------+--------------------------
Encrypted           |False               |none      |The file is not encrypted
--------------------+--------------------+----------+--------------------------
VBA Macros          |No                  |none      |This file does not contain
                    |                    |          |VBA macros.
--------------------+--------------------+----------+--------------------------
XLM Macros          |No                  |none      |This file does not contain
                    |                    |          |Excel 4/XLM macros.
--------------------+--------------------+----------+--------------------------
External            |0                   |none      |External relationships
Relationships       |                    |          |such as remote templates,
                    |                    |          |remote OLE objects, etc
--------------------+--------------------+----------+--------------------------
In this case as you can see the file is a →MSI installer. There are more options, but I didn’t describe them yet.
MSI
Microsoft Installer file.
Usually you can just extract this file with 7z:
$ 7z x src/malware.doc
For quick stream extraction with oletools you can use python:
import olefile

ole = olefile.OleFileIO('1234')
for i, stream_name in enumerate(ole.listdir()):
    print("Found stream:", '/'.join(stream_name))
    data = ole.openstream(stream_name).read()
    with open(f'{i}.out', 'wb') as f:
        f.write(data)
ole.close()
But for real reverse-engineering I recommend msitools
$ nix-shell -p msitools
Then you can:
$ msiinfo tables agent.msi  # get all tables
$ msiinfo export agent.msi TABLENAME  # print a table content

$ msiinfo streams agent.msi  # get all streams
$ msiinfo extract agent.msi STREAMNAME  # export a raw stream data
In streams, the actual installed program data will usually/often be in a .cab file. Extract .cab and start
In tables, it’s a good idea to check:
CustomActionfor interesting callbacksPropertyfor metadataRegistryfor written registry keys
That’s it - time to start over.
Pyinstaller
In general, reverse-engineering of Python programs consists of two steps:
- dumping the bytecode
- analysing the bytecode
In case of Pyinstaller, the situation is usually simple because there are off-the shell tools of high quality. I recommend pyinstxtractor-ng, another older option is pyinstxtractor.
python3 ~/opt/pyinstxtractor.py malware.exe
If you managed to get the bytecode, continue from →Python Bytecode.
Otherwise, your best bet is dynamic analysis (the plain bytecode eventually lands in memory. Additionaly, all binary files are saved to a temporary location too).
Python Bytecode
You need to either disassemble or decompile the code. Try, in order:
- →pycdc - current state of the art of python decompiler (doesn’t always work).
- →pyc disassembly - disassemble the bytecode and analyse manually
pycdc
The best currentl decompiler is pycdc. If you’re lucky it’s packaged in your distro, otherwise you need to clone the repository and compile it yourself.
nix-shell -p pycdc
pycdc _extracted_malware/malware.pyc > malware.py
If it worked, you now have a decompiled Python script that should be a breeze to decompile: →success.
If it didn’t work, you’ll have to read →pyc disassembly.
pyc disassembly
In the worst case, you can always read the disassembled bytecode directly. Your options are:
dis
Surprisingly, even though Python includes a dis module, I’m not aware of any built-in
script to actually disassemble Python bytecode. So you need to save this somewhere:
import dis, sys, marshal

path = sys.argv[1]
with open(path, "rb") as f:
    f.seek(16)
    dis.dis(marshal.load(f))
Run it like this:
nix-shell -p python313  # You need a correct python version!
python3 view_pyc_file.py malware.pyc > malware.pybc
The caveat is that that this depends on the Python version, so you need to use the same Python version for disassembly as the Python it was compiled with.
If you’re lucky and it worked, go →read the bytecode. Otherwise, try →xdis.
xdis
You may also consider xdis, which is pure Python library for disassembling Python bytecode.
It is independent of the interpreter version, so you don’t have to worry about installing a correct
Python.
TODO example
This should work. If it did, go →read the bytecode. Otherwise, it’s possible you’re dealing with an obfuscated bytecode, or even worse - a custom CPython build. I don’t have anything written up about that yet: →bad end.
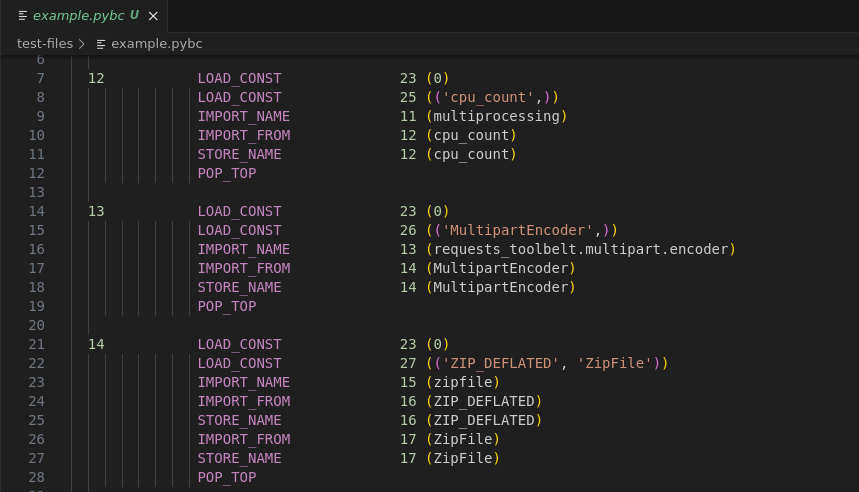
Read the bytecode
Any text editor will do. I just want to mention vscode-python-bytecode-highlight, my vscode extension for python bytecode syntax highlighting. It colours the bytecode nicely and makes some links clickable - but that’s it. You can use any other editor.
That’s hopefully enough to →finish.
Delphi
First, load the binary to IDR (https://github.com/crypto2011/IDR) in a Windows VM. This may take a long time.
Then export as a .IDC script.
Then use https://github.com/huettenhain/dhrake and DhrakeInit.
That’s all I have →for now.
Dotnet
This means that the executable is a .NET assembly. Now, depending on how obfuscated the sample is:
- Use →ilspycmd for quick analysis and triage.
- Use →dnSpy for serious reverse-engineering.
- Use →dnLib for automating the deobfuscation process.
- Use →dotnet sdk to quickly unpack malware by reusing the unpacker’s code.
- Use →Visual Studio if dotnet-sdk doesn’t work.
- Check out →dbglib for obfuscated samples that elude dnSpy debugger.
ilspycmd
For lightweight analysis, I recommend ilspycmd.
sudo docker run -v .:/docker --rm -ti berdav/ilspycmd -c "cd /docker; /home/ilspy/.dotnet/tools/ilspycmd -p malware.exe -o out_dir"
This will decompile dotnet_malware.exe to out_dir. After that you can easily open the decompiled code in your favorite editor, or use standard Linux commands (like grep) to analyse it.
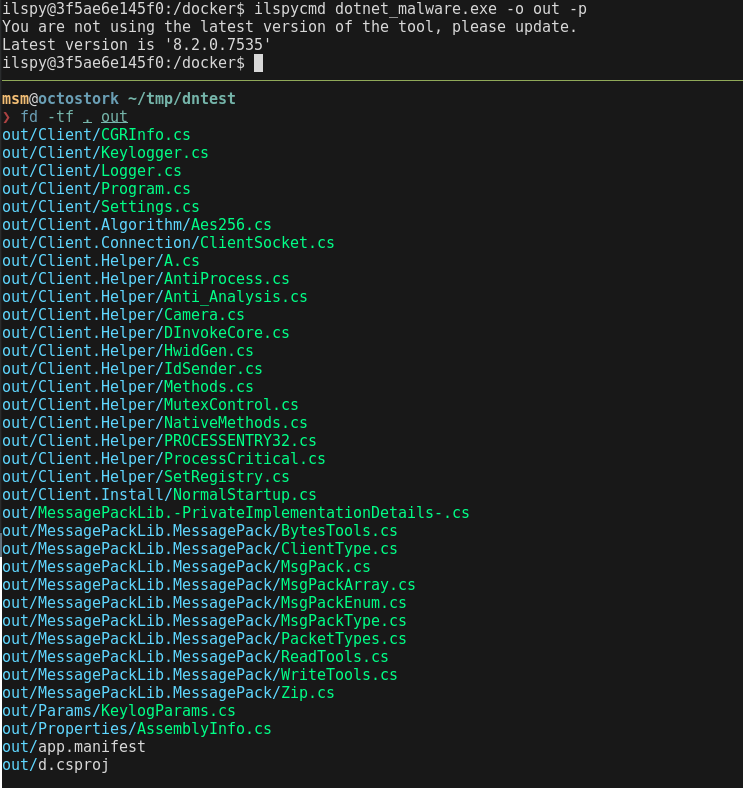
The downside is that this code is fully static, it’s not possible to debug it, and there is no east way to deobfuscate anything. In some cases ilspycmd will flat out refuse to decompile some of the code. In this case, you may have to turn to →dnSpy.
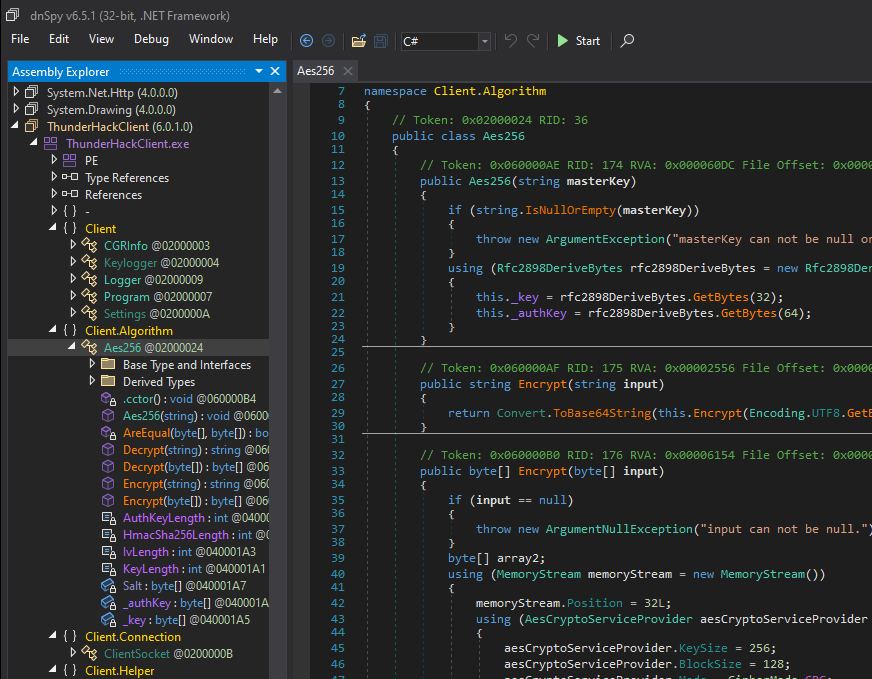
dnSpy
For heavyweight analysis, I recommend https://github.com/dnSpyEx/dnSpy. It’s a GUI, but it’s very powerful and contains a built-in debugger. Unfortunately, it’s Windows-only - at least I prefer to stay as much as possible in Linux for reverse-engineering.
dnLib
DnSpy is based on dnLib, which is a .NET library for when you really need to get your hands dirty
and start scripting the analysis - see for example this XWorm analysis
(the idea is clear, unfortunately full framework was not open-sourced).
Since I mostly script in Python, I use pythonnet a crazy library that brings .NET to Python. This allows
me to use dnlib like This:
from dnlib.DotNet.Emit import OpCodes

def get_string_default_values(typeobj):
    """Get all variables initialised to a string as a dict.
    Ignore other initialisation code.
    typeobj is TypeDefMD from dnlib.DotNet."""
    static_ctor = typeobj.FindStaticConstructor()
    if not static_ctor:
        return {}

    result = {}
    code = static_ctor.Body.Instructions
    for i in range(len(code) - 1):
        if code[i].OpCode == OpCodes.Ldstr:
            if code[i+1].OpCode == OpCodes.Stsfld:
                fieldname = code[i+1].Operand.Name.String
                fieldvalue = code[i].Operand
                result[fieldname] = fieldvalue
    return result
For example, that is a code snippet that extracts all string initialisations from a static constructor. It’s an extremely useful piece of code when writing automatic extractors for .NET stealers (of which there are plenty)..
dotnet sdk
A powerful unpacking method is a code reuse. For example, let’s say decompiled malware contains this line:
GCP gCP = (GCP)Marshal.GetDelegateForFunctionPointer(GetProcAddress(hModule, Reverse(Decipher("zzljvyWaulyybJalN", 7))), typeof(GCP));
Instead of reverse-engineering Deciper, you can just reuse the code in your own small tool:
nix-shell -p dotnet-sdk
dotnet init
vim Program.cs
And put this code in Program.cs:
internal class Program
{
	// Reverse and Decipher methods, copied from decompiled source code.

	private static void Main(string[] args)
	{
		Console.WriteLine(Reverse(Decipher("jvssHzsM", 7)));
	}
}
And just run it:
dotnet run
it goes without saying, that you should be careful when running malware code - I recommend doing this in a Docker container or a Virtual Machine.
Visual Studio
dbglib
Honourable mention goes to dbglib, which is my library for native low-level .NET debugging. See this DotRunPeX analysis for a tutorial how to use it.
golang
Well, you’re in for an adventure. Golang is not the easiest language to reverse-engineer. By default the decompiled binary looks like trash, but with help of a few tools it’ll get slightly better.
My main decompiler/disassembler is Ghidra. Most of the hits should transfer to other tools, but this guide is opinionated and I’m not going to cover them.
First, load the executable to Ghidra. Since recently, Ghidra has a basic Golang support, so remember to select
x86:LE:32:default:golang language instead of the default choice.
The support is not great right now, though. To get the symbols, we will use GoReSym:
nix-shell -p goresym
GoReSym -t -d -p malware.exe > goresym.json
Then, load the symbols to Ghidra using a helper script (goresym.py) (TODO: modified cerberus, upload and link).
For malware, most likely the binary is obfuscated and you will still see junk function names:
But that’s still a step up compared to what you get by default.
After that, you can try ghostrings to recover strings from the binary:
Install the extension, and run several of the included scripts:
- GoDynamicStrings.java
- GoStaticStrings.java
- GoKnownStrings.java
- GoFuncCallStrings.java
Some of the scripts will take a while. Go make a coffee (you will need it).
After that, you should have at least strings defined, and the methods named. Reverse engineering will still be a pain, but at least you have some context.
That’s all I have →for now.
Office file
Office files include:
- files with
.docx,.xlsx,.pptxextensions - files with
.docm,.xlsm,.pptmextensions (with macros)
A good way to start analysis is to use oletools. Use oleid to check if there are any macros:
nix-shell -p python310Packages.oletools
oleid sample.xlsx
See also this writeup.
If you found macros, you can proceed with oletools - for example by using olevba.
nix-shell -p python310Packages.oletools
olevba -c sample.xlsx > source.vba
(this will put some additional headers in the extracted snippet. The reason is that there may be multiple VBA snippets in the file. Remove the header and footer manually)
If you didn’t find any macros, you can start a more low-level analysis. First, extract the file with 7zip
7z x malware.xlsx
This will extract the embedded files. Usually the interesting files are macros, but as you can notice, in this case the payload is in embeddings.
In this case, you can use oledir to dump the OLE container:

As you can see, there is a stream called OLe10nATive, and oledir even tells us that it’s related to a CVE.
You can extract this file with oletools, or use 7z again.
Other executable type
TODO
- Compiled .NET executables?
Other unsorted notes
Check compiler (nauz)
git clone https://github.com/horsicq/Nauz-File-Detector.git
sudo docker build . -t nauz
sudo docker run -v /home/msm/data:/home/msm/data nauz nfdc /home/msm/data/2024-12-18_ov8865sys/9c52d750eba2f72bdd38bcaf950da7f1128d5235223091d98dad2cc7146716fa
Gx64Sync
ImHex
floss -j binary.exe –only stack tight decoded > floss.json
Dumps
malduck fixpe
Themida
Entrypoint starts with a call:
e8 82 01 00 00    CALL       FUN_141fdd237
41 52             PUSH       R10
49 89 e2          MOV        R10,RSP
41 52             PUSH       R10
49 8b 72 10       MOV        RSI,qword ptr [R10 + local_res8]
49 8b 7a 20       MOV        RDI,qword ptr [R10 + local_res18]
fc                CLD
b2 80             MOV        DL,0x80
And later there is a tree of “if” statements:
  if (bVar12) {
    bVar11 = CARRY1(bVar7,bVar7);
    bVar7 = bVar7 * '\x02';
    bVar12 = bVar11;
    if (bVar7 == 0) {
      bVar7 = *local_res8;
      local_res8 = local_res8 + 1;
      bVar12 = CARRY1(bVar7,bVar7) || CARRY1(bVar7 * '\x02',bVar11);
      bVar7 = bVar7 * '\x02' + bVar11;
    }
    if (bVar12) {
      bVar11 = CARRY1(bVar7,bVar7);
      bVar7 = bVar7 * '\x02';
      bVar12 = bVar11;
      if (bVar7 == 0) {
        bVar7 = *local_res8;
        local_res8 = local_res8 + 1;
        bVar12 = CARRY1(bVar7,bVar7) || CARRY1(bVar7 * '\x02',bVar11);
        bVar7 = bVar7 * '\x02' + bVar11;
      }
The called function looks like this in Ghidra:
void FUN_141fdd237(void) {
  puVar2 = (undefined8 *)&stack0xffffffffffffffd8;
  pcVar1 = unaff_retaddr + -0x1de20b5;
  pcStack_30 = unaff_retaddr;
  if (*(int *)(unaff_retaddr + -0xf9f66e) == 0) {
    uStack_38 = 0;
    uStack_48 = 0;
    pcStack_40 = pcVar1;
    pcStack_30 = pcVar1;
    (*unaff_retaddr)();
    puVar2 = &uStack_48;
    pcVar1 = unaff_retaddr + 0x1cf;
  }
  (*(pcVar1 + 0xe42a47))(*(undefined8 *)((longlong)puVar2 + 0x20),*(undefined8 *)((longlong)puVar2 + 0x18));
  return;
}
This is the first layer of the packer. To unpack dynamically, add a breakpoint at the ret 0x20 instruction
in the entrypoint and then run the binary.
Second stage is much more interesting, but also I currently don’t have a writeup for it.
Powershell
- PSDecode
Success
Hopefully you arrived here by following the checklist and found a reverse-engineering method that works for you.
…unless there’s a second stage, then start from the beginning.
Bad end
I’m sorry, but it looks like this checklist is not able to help you for now.